Honda Twins banner

1976 CB500T Vintage Custom

8.3K views 28 replies 12 participants last post by  76TWIN  
#1 ·
A few of y'all have welcomed me to the forum already, I really appreciate it! I'm looking forward to having everyone along for the journey as I customize my Honda CB500T.

Background

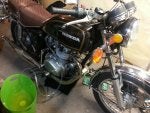
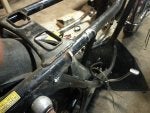
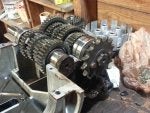
I'm an Aerospace Engineering student at the University of Florida, USA. Haven't had much riding experience but have always wanted to get into it. I also always wanted to work on a vintage bike. I just love the practicality of the old twins. I don't have too much wrenching experience, but I'm very mechanically inclined. My project is a '76 Honda CB500T with about 17,000 miles on it. When I purchased the Honda it was a fully rideable garage kept motorcycle. In my mind I keep calling it my "clean slate".

Plans

Engine
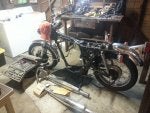
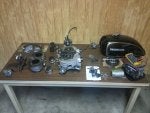
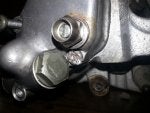
1. Complete tear down. Assess condition of engine and rebuild. Check tolerances, timings, gaskets, etc.
2. Rebuild starter clutch. Curse these dumb things. Getting the clutch apart will be difficult.
3. Weld up a custom 2-into-1 exhaust. Beige exhaust wrap.
4. Remove airbox. Add pods.

Electrical
No specific plans yet other than a general modernization of the electrical systems. Dyna-S ignition, maybe new coils, maybe update battery, new wiring, reduce cluster to speedo and tach, add toggles for lights and ignition. Those are just a few thoughts right now. Definitely going to add the Dyna ignition and redo the wiring harness.

Frame/Aesthetics
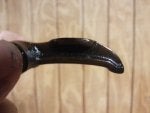
1. Remove head steady. "The Fang" suggests that this reduces felt vibration and transforms the bike.
2. New grips and add end mirrors.
3. Fork gaiters.
4. Add leather sidecover bags.
5. Custom seat. Thinking I might make my own. I like the color of the original seat, but man, that "modern" shape ruins those classic lines.
6. Strip and paint tank. Thinking forest green with beige trim. I also might paint the engine barrels black to break up the engine some.

Man, that didn't seem like it was that much in my mind, but it definitely added up quickly! I'm looking forward to working on it with y'all (I'll be needing all your advice)

And of course, pics attached.
 

Attachments

#3 ·
Looks pretty clean. :D
There is a place that will trap crud that is not easily noticed though. The crank. To lubricate the big ends the oil is pumped in through the oilways through the flywheels and from there to the crank pin. Its worth checking to ensure that no deposits have started to build up there.
Also check the cam shaft lobes and journals for excessive wear, the LH side is the side that is most likely to suffer first, its the furthest away from the pump.
The pic is from the 450 manual which has more detail than the clymer with the exception that the bearings have changed from roller to ball in the 500T
the second is from the 500T clymer manual
[attachment=1:2i8nvlk8]Honda_CB450_CB500T_crank detail .pdf[/attachment:2i8nvlk8]
[attachment=0:2i8nvlk8]P10 full .jpg[/attachment:2i8nvlk8]
 

Attachments

#4 ·
Thanks for the post Nige!

I will be sure to add that to my checklist Word doc. Also, thanks for that great image! I haven't seen that section view before. It definitely helps me wrap my head around visualizing everything.
 
#5 ·
Here's a small progress update.

Y'all will find that I'm a bit of a night owl. You'll see plenty of late evening/early morning posts by me. For all my numbered posts, there are pics attached; on to my progress:

1. I removed the wiring harness and left all the components on the bike. I really want to streamline the wiring where I can.

2. I checked the cam followers and cam shaft lobes. I haven't mic'd them but the cam followers look pretty good. Let me know your thoughts. The cam lobes look pretty good too. I will mic them soon enough. I'm going to do all the measuring probably next time.

3. I removed the tabs from the seat section which include the seat's pin pivot tabs and locking mechanism. I was then grinding for like 40 minutes or so, got bored, and called it a night for grinding. I picked up a cheap grinder from Harbor Freight today and it seemed to be working fairly well.

Now, onto some questions:

1. How's my cam chain tensioner look? I think the gear's teeth are marginal. Let me know.

2. Unfortunately, I have some stripped hardware in really terrible spots. One screw is in a "valley" of sorts, it is one of the screws which retains the tach gearbox I believe. There are two more stripped screws, they are the two which retain the "bearing set plate". I don't know what to do about these. I don't think I have the skill to get them out myself. I guess I am going to take them to a machine shop? Are these screws ones that they can get out? How much do you think it'll cost me? Stripped hardware is incredibly frustrating.

3. I might have disassembled my engine out of order or something, because I would like to remove the drive sprocket, and, the subsequent transmission gears. However, I can't find a way to hold it all steady while I wrench on the sprocket bolts. Any ideas on what to do?

That's all for now. I'd really appreciate some advice!
 

Attachments

#8 ·
I would say that tensioner sprocket is definitely not in good enough shape to use and must be replaced. Someone really did a hack job when they worked in the motor. The stripped screws are pretty much done. Did you use a impact driver? Try to cut a groove with a hacksaw blade and then use your impact driver to do the job. Should be able to get it out then.
 
#9 ·
Yep, impact screwdriver is essential, the kind that you strike with a hammer. For cutting a new slot in the screw head, a dremel tool with a miniature carbide cutoff wheel would be easier than a hacksaw blade. Just be very careful to keep it under control. There are a lot of threads on here regarding how to deal with fasteners that are stripped or have the heads destroyed. Take a look with the search function.

An easy way to disassemble that sprocket is to use your old chain. It is probably junk and needs to be replaced anyway. Wrap it around the sprocket and hold it with something -- bench vise, vise grip pliers, etc. That will let you remove the two bolts.

Ray
 
#10 ·
Thanks for the responses Drifter and fxray!

Drifter, I've already tried it with the impact driver. Unfortunately cutting into the screw head is impossible given the surrounding case geometry. And unfortunately, the other two screws are countersunk. So I'm thinking I will have to see what a machinist can do. Concerning the tensioner sprocket, I am not happy to hear this! Dangit. More money. I don't really know what to do here. From my research it seems that I only have two options: buy another cam chain tensioner assembly whose sprocket is in better condition, or purchase a replacement steel sprocket from Franco Cappellini. I might be leaning towards the latter. I don't know. Thoughts everyone?

Fxray, using the chain is a great idea that didn't even cross my mind! Thanks a bunch!
 
#11 ·
could perhaps soak them down with pb blaster then use an extractor type thing...
http://www.lowes.com/pd_232656-1083-358 ... facetInfo=

They sell them in bigger and smaller sets than this.

I've used these on little ity bity screws that I probably had no business drilling into ...
and bigger screws... 6-10mm or so with very good results.

I had no other way to do it. And certainly couldn't afford machinist.

Just be super steady handed when you drill the pilot hole! ...so you don't damage the treads in the case. You will, of course, have to replace the screws with new ones.

Take your time, use some WD-40 on the drill bit to keep it cool/lubed . Practice on some other screws somewhere that you don't care about before you attack your engine.....

anyway... just a thought.

oh, and...nice bike. I have the same red, but not as good condition. Are you going to get rid of that seat? I might be interested. thkz
 
#12 ·
Thanks for the reply truckel!

I am not quite sure if I am confident enough in my skills to perform an ez-out type operation. I have been debating it the past couple of days. I think I'm going to sit on it for a while and see what I decide.

Concerning the seat -- I haven't decided yet on that either! I have recently been debating cannibalizing it so that I don't have to make a custom seat pan. This would save me a lot of work and it would naturally be of higher quality than anything I could fab up. I'm probably going to hold on to it. But if I do end up selling it, I will look you up first!
 
#13 ·
thanks.
I mostly need the cover. mine has a rip. my pan is okay.
though, of course remounting a used seat cover?will probably be a pain, but i am willing to try. .....anyway. keep me posted.
 
#14 ·
HondaGator said:
I am not quite sure if I am confident enough in my skills to perform an ez-out type operation. I have been debating it the past couple of days. I think I'm going to sit on it for a while and see what I decide.
Gator, if you decide to drill in order to use an extractor, I'd try this first. Drill as dead-center on the fastener head as you can, using a bit that is just large enough that the head of the fastener will be cut off the shank. That will let you remove the cover and will leave a bit of the fastener standing proud of the surface below. With the head removed, there will no longer be any bolt stretch and the remains of the fastener can often be removed easily. I read all the time of people breaking the end off the easy-out extractor and then being unable to drill (the extractor is hard, like glass). At that point, it almost has to be removed by a shop with an EDM.

The cross-point or Phillips head fasteners (I know, I know they are JIS) lend themselves to centering the drill, so long as someone has not badly butchered the head.

Good luck!

Ray
 
#15 ·
I have to agree with fxray - drill the top of the head of the screw.

I will always try an impact driver first, after 3 or so good hits if there is movement then I go straight to the drill and have it sorted in a couple of minutes. I've not had a problem drilling the heads off, I had to drill almost all the heads of on of my 450 engines... Time consuming but it worked as needed.

Once the head is off and the cover removed, the remaining thread will come out by hand or pliers, often if you put the drill in reverse after drilling it a little, it will come out also making life much easier.

Avoid the easy out as much as possible, it often leads to more trouble...

-Andy
 
#16 ·
Thanks for contributing ajordan!

I think this approach may work for the screw on the tach casing, but I have my doubts about the 2 countersunk screws inside the lower casings. I'll let y'all know how it goes concerning the tach screw as soon as I can find some time to neglect my studying!
 
#18 ·
Once the head is off and you can remove the casing then you can use localised heat on the offending the threaded part of the screw. The heating op and subsequent cooling may be enough to break the corrosion and allow the screw to be unwound easily.
Also be prepared to re-thread with 6mm 2 or 3D (2 or 3 times the diameter) thread inserts if the threading onto the casing is corroded badly
 
#19 ·
Screw removal tricks -

1. Aero-Kroil is a superior penetrating oil, it work well with a propane torch to heat the aluminum case. Repeated heating/quenching is necessary.
2. If you need to drill the fastener, get a set of left hand drill bits. Use a bit smaller than the screw root diameter and drill deep. Sometimes the left handed bit will back the screw right out.
3. Extractors are trouble, if the screw is already stuck and the head gets rounded, using an extractor with the potential to break off is going to risk more trouble. If the extractor doesn't EASILY remove the screw, use another method. Vinegar boiling or heli-coil are prefereable to a piece of hardened tool steel stuck in there.
4. If heat, Aero-Kroil, and then left hand drilling fail try cooking the part in vineger. This assumes a carbon steel screw in an aluminum case. The steel screw will be eaten away and the aluminum won't be hurt. Paint will come off though. This works with a small crock pot for little parts, figure on 24 hours of boiling.
5. Heli-coil is not a bad solution, I've done this for head studs on 90CC motors. Hard to drill the screw out concentric to the middle of the screw, the bit will want to wander off into the aluminum. Use a drill press and/or build a jig to keep the bit straight.
6. Machine shops are surprisingly cheap in my area. Hire a preofessional if you can, chances are you'll spend less than if you go progressively through all of the options above.
 
#20 ·
Aero-Kroil is pretty good stuff. I've also had really good luck with homebrew penetrant consisting of equal parts acetone and Dextron ATF. Mix it up, spray it on, and give it a little time.

Birthday candles and heat work too.


On stripped heads, a small/sharp/well-placed chisel can get things moving. Use the corner of the chisel to dig in to the side or outside-face of the screw, and try to rotate by striking gingerly. Be careful about keeping the surrounding area pretty...
 
#21 ·
Thanks for the responses John, Honest, and xHoladay!

I think I'm going to have the screws drilled out by a professional. I have about a $500 paycheck coming up soon. I don't mind spending some money to make sure it gets done right. I'm confident I can convince the locals to give me, a poor college student, a decent price. I really appreciate all of y'alls feedback though. It's good information that I will keep with me for future use.

Thanks again!
 
#22 ·
I have another couple questions for everyone!

First
I would like to install pod filters for my intake. However, if I mount directly to the carb they will sit in a position that is not desirable. My question is this: if I use rubber hose to "snake" both carb inlets towards the center of the underside of my seat, will that negatively affect airflow? (assume no sharp angles) Also, what are the rules for mounting filters? For instance, is it a "no-no" if their sides are touching against each other? Do you have to have dead space on all sides of the filter?

I know these are somewhat subtle topics. Your feedback will be much appreciated.

Second
I think instead of welding up a 2-into-1 exhaust, I thought I might sell my current exhaust headers/mufflers and purchase CB450 headers (LOVE the lines on these) and mount up two 12" Shorty cans. Considering my main impetus was weight saving, this option is roughly equivalent. My question is this: what is everyone's experience with the Shortys? Are they too loud? Any attempts at diy baffle inserts to enhance quieting?

Link:
http://www.dimecitycycles.com/vinta...at-chopper-custom-motorcycle-exhaust-parts-12-inch-shorty-muffler-80-03310.html


Let me know, guys! I welcome everyone's input. Especially from you twin veterans out there!
 
#26 ·
I have another couple questions for everyone!

First
I would like to install pod filters for my intake. However, if I mount directly to the carb they will sit in a position that is not desirable. My question is this: if I use rubber hose to "snake" both carb inlets towards the center of the underside of my seat, will that negatively affect airflow? (assume no sharp angles) Also, what are the rules for mounting filters? For instance, is it a "no-no" if their sides are touching against each other? Do you have to have dead space on all sides of the filter?

I know these are somewhat subtle topics. Your feedback will be much appreciated.

Second
I think instead of welding up a 2-into-1 exhaust, I thought I might sell my current exhaust headers/mufflers and purchase CB450 headers (LOVE the lines on these) and mount up two 12" Shorty cans. Considering my main impetus was weight saving, this option is roughly equivalent. My question is this: what is everyone's experience with the Shortys? Are they too loud? Any attempts at diy baffle inserts to enhance quieting?

Link:
12" Shorty Muffler | Chrome Shorty Motorcycle Muffler


Let me know, guys! I welcome everyone's input. Especially from you twin veterans out there!

Hey Man

I actually did the same thing I put some 450 headers with shorty mufflers about like that on my bike. Oddly enough I haven't particularly run into jetting problems. As far as noise if you really get on the throttle they can be kinda loud but just for chugging around town its no problem. I'm still not nearly as loud as the harley guys. I also replaced my air filter paper with foam. Keeping the stock air box set up really is the best option as far as airflow into the stock carbs. Its rather easy to remove the paper. The adhesive that they use will come right off with a little heat from a propane torch. Then just clean them up, re-secure the wire mesh using some epoxy or silicone and buy some uni filter foam cut to size and install.
 
#23 ·
My .02 cents...

If mounting pod filters, consider using the original rubber mounts from the original air filters (between filter and carb) to mount to. Mounting to the original rubber mount will probably help with tuning the bike correctly. I have mounted the uni foam filters to the rubber mounts from the original filters, everything fits nicely.

When using pod filters, I believe many people have trouble with the cheaper emgo pods and it will be worth spending more for the K&N filters in the long run.

Sorry, cant help on the exhaust question.
 
#24 ·
For those of y'all following the thread, I thought I'd post a response that I received from Youtube celebrity, and all-around nice guy, mrmaxstorey! I correspond with him from time to time and he has always offered great advice. For those of you who don't know him, I highly advise that you check out his Youtube channel. He has a lot of great DIY videos for everything from motorcycle maintenance to restorations. He's created a real compendium of knowledge.

mrmaxstorey Youtube channel

http://www.youtube.com/user/mrmaxstorey


response after viewing my recent questions

"The answer to your question about the pods, is "it depends." The advantage to the airbox is it collects and organizes the air flow into a nice steady stream. Pods are criticized because they actually disrupt the stream into a chaotic mix of vortexes which is not efficient at picking up gas particles in the carburetors. So, some guys will actually put a short length of tube after their carbs in order to even out this stream. You want to avoid any interruptions here, so if possible don't just get some rubber hose and connect it over the airbox. Mount it up flush and attach a collar around both. The lip of the carb body would otherwise disrupt the air flowing in and create less efficiency. As far as whether the pods can touch, generally that shouldn't be a problem, but you'll be doing a lot of experimentation with jetting to get the mixture right anyways so you'll know if it is not getting enough air."
 
#25 ·
ajordan:

I should be more specific when I say "pods"!

I think I'm going to go with Uni filters. My reason is that I believe their construction, and their ability to be oiled, will most effectively ward off the incessant Florida rain. Thank you for your input!
 
#27 ·
I think you will run into some carb issues with the pods. Most do.
Might have to do some trial and error with jetting to get it to run right with the pods.

IMO you're not going to get the same kind of performance from pods than the stock airbox. Most of the times performance is much worse when using pods.