Honda Twins banner

CB450 / CL450 valve train assembly pictorial

70K views 59 replies 33 participants last post by  bake 
#1 ·

I'm finally getting around to putting this CB450 engine back together. I've had a variety of obstacles this last year.
I'm going to try my hand at documenting the process - here goes:
One of the main things that draws me to the 450 is the torsion-bar valve spring mechanism. It speaks to me somehow.
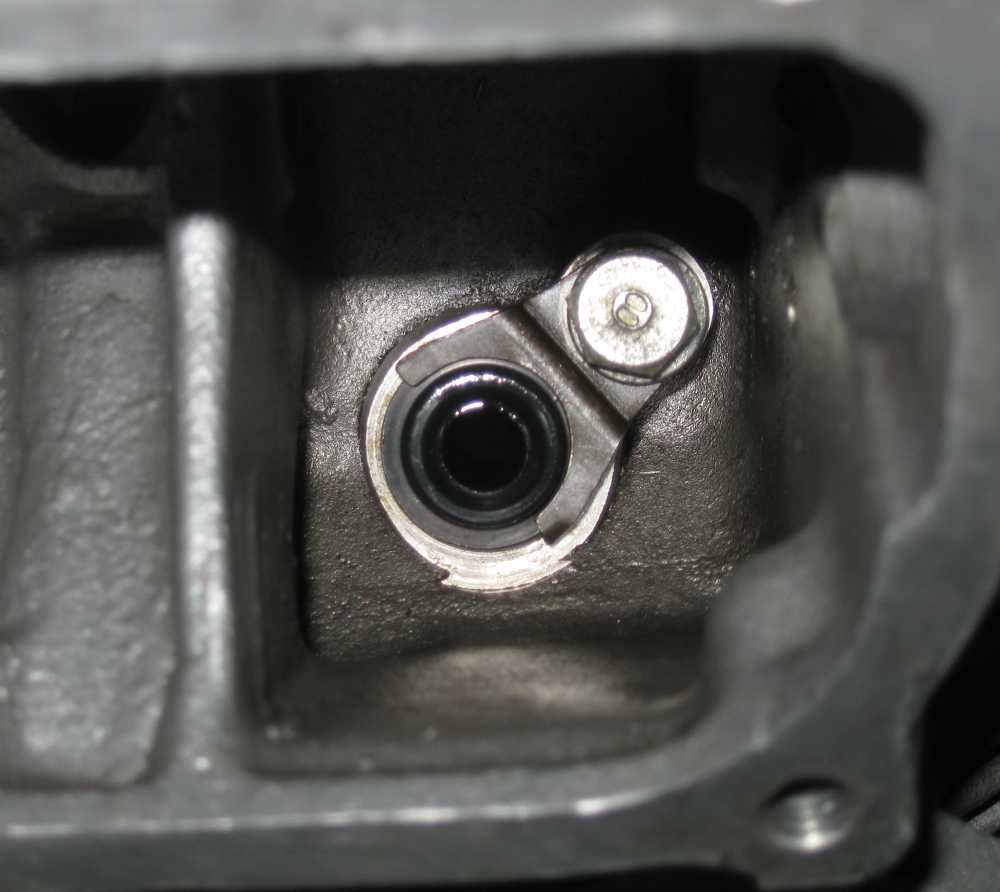
I've had the head spiffed up at my local machine shop. I've installed new valve guide seals, the original "cap" kind held down with the little fork-thing:


The torsion bar assembly goes in first. They come labeled "A" or "B". The A assemblies go on the right intake and the left exhaust. The Bs go on the left intake and right exhaust. These photos are of the right intake. Fish the splined tube in to the hole, and thread it through the valve closer fork.
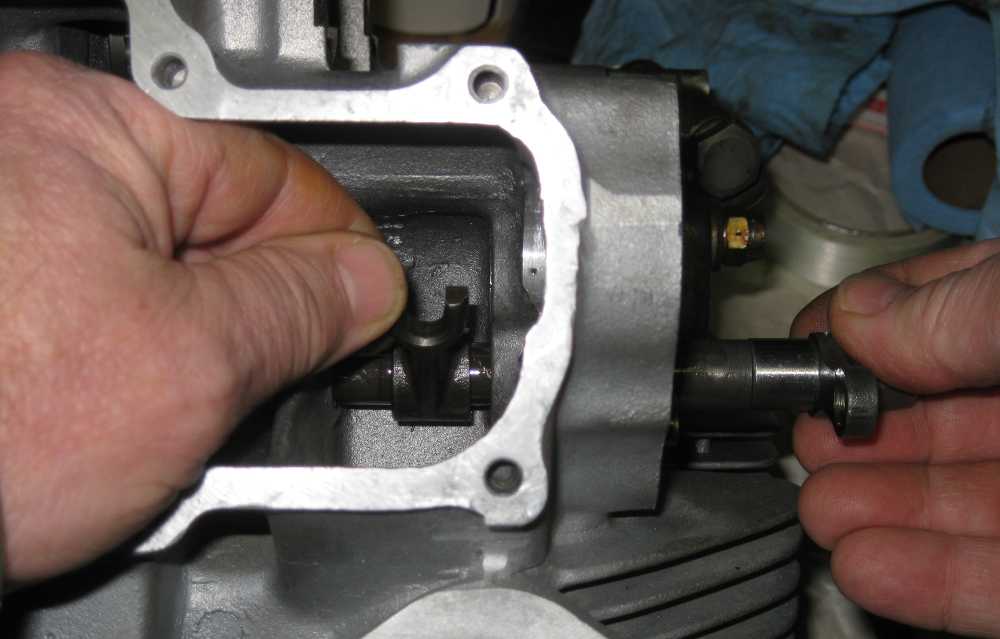


The fork will only engage the splines in the correct position. This shot shows the approximate relative position of the fork and the anchor arm where this happens.


It's a fine time now to stick the valve in, and see that the hook straddles it:
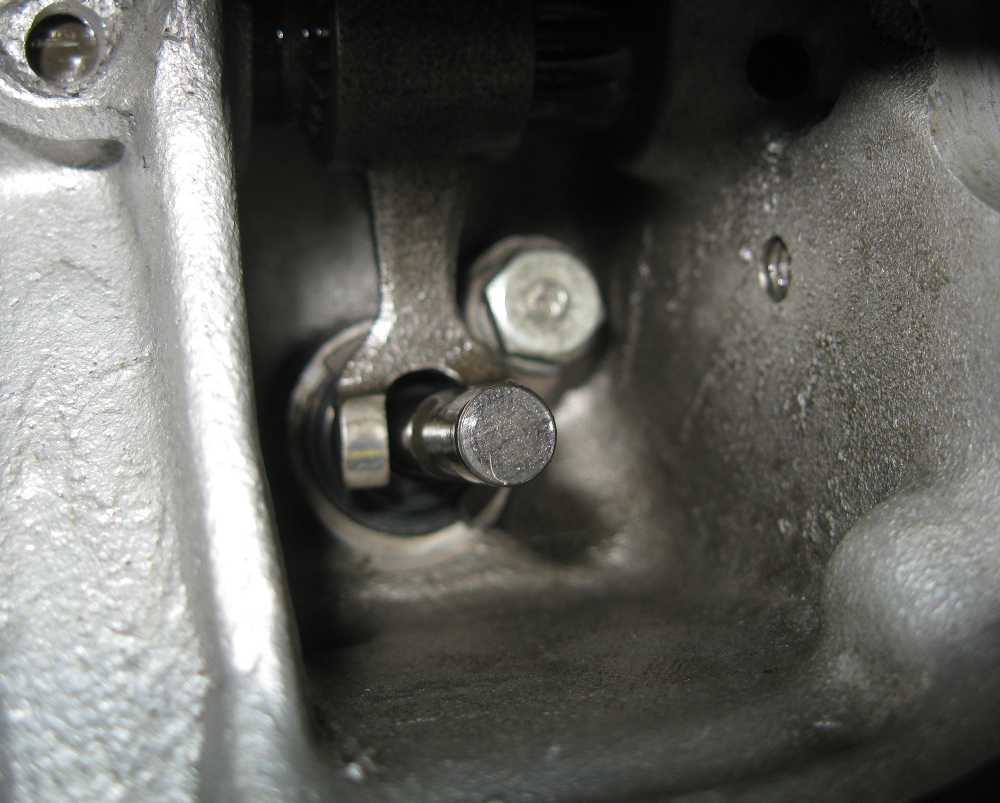


Let the anchor flop down


Drop the keeper ring over the valve stem, flat side down:


Put a speck of Vaseline (or other goo of your choice) on one of the keepers:


And place it on the valve stem, engaged in the grooves:


With both keepers in, you can rotate the torsion bar anchor up to see that the keepers are restrained in the ring:


A 14mm open-end wrench works to load the spring by rotating the anchor until it lines up with the hollow pin. When it is, you can tap the works inwards:


And then put the bolt in


Now you can fish the eccentric follower shaft through its hole in the head and into a follower. Wish my fingers weren't so stubby...


The follower will lay right down on the valve stem:


Rotate the eccentric shaft until the mark on the end points to the camshaft axis. This makes the cam clearance as large as it can be:


Once the other side is done, the camshaft can go in. Orient the cam such that both lobes point outwards away from the followers. This way, you'll have clearance between the base circle of both lobes and the followers. Note the notch in the opening where my finger is on the right. The other end of the cam goes in first, and this notch is there to clear the cam for installation.
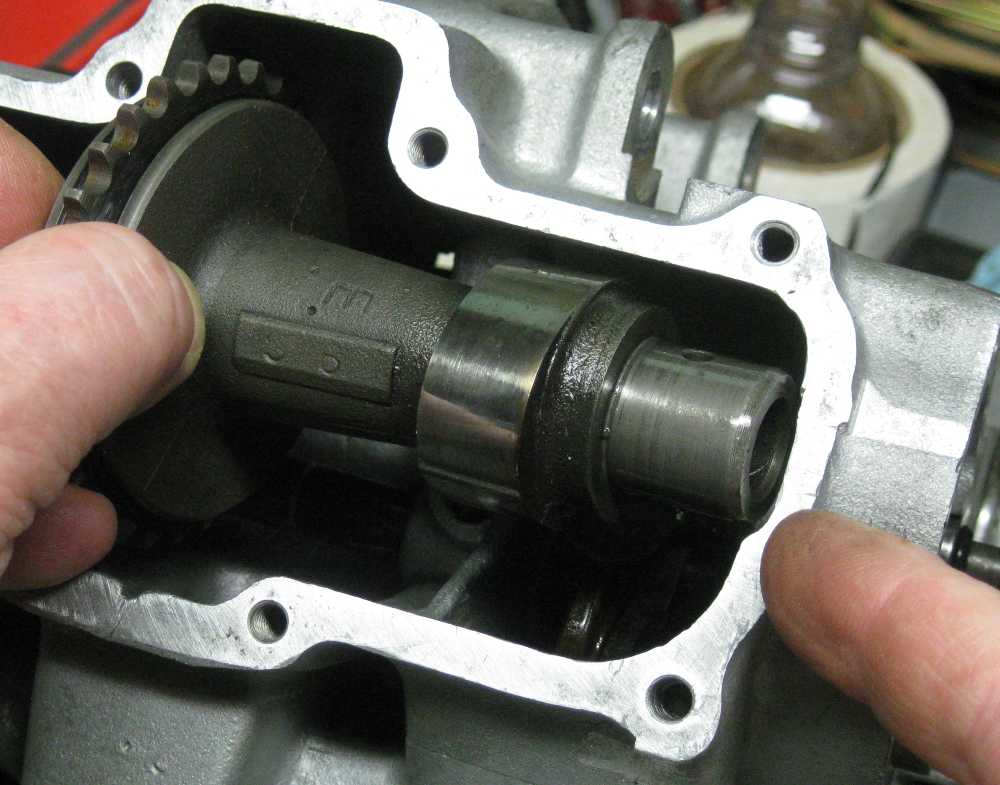


With the cam in, and the eccentrics away from it, the bearings can go on. Fidget with it until they slide in easily. If you have to force it, something is mucked up.


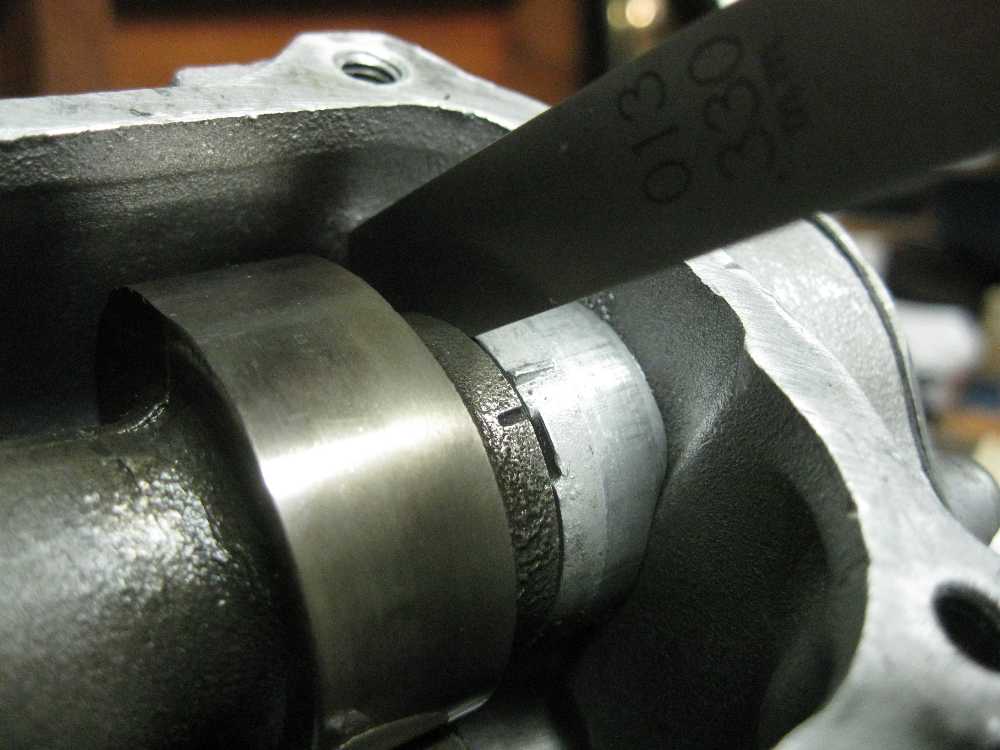
But wait! There's more! The axial play of the camshafts should be between 0.05 and 0.35mm (.002" and .014"). Once you tighten the cam bearing screws (with your new gaskets) you'll be able to measure the clearance with a feeler gage. Mine here is .013". I'll get a shim from my dealer, who has them in .1mm and .2mm thicknesses, and I'll have the option of moving my clearance closer to the middle of the specified range.
Also, the intake cam will be close to the alignment position needed to get the cam chain on. You can see the alignment marks in this photo too.


The exhaust cam is will need the same endplay adjustment routine. The alignment mark is a little harder to get to, as it is on the other side of the cam. Here's why: The index mark on the crank puts the Left piston at top dead center, but not between a compression stroke and a power stroke, as you'd think. Mr. Left is between an exhaust stroke and an intake stroke. That's why the timing mark won't quite line up on the intake cam - it should be already beginning to open at that point. Mr. Right trails Mr. Left by 180 (crank) degrees, or 90 cam degrees. When Mr. Left is at TDC, Mr. Right is at BDC, between a power stroke and an exhaust stroke. Since Left is just ending an exhaust stroke and Right is just beginning one, both exhaust valves are open a bit when the exhaust cam is at timing (chain install) position. So somehow you need to rotate the cam from the position where it was easy to install to where the index marks line up, with both exhaust valve open a bit. I horsed mine around with a screwdriver prying against the sprocket teeth. Crude, yes, but effective.


I didn't bother with new gaskets (bearing caps), seal (distributor drive), O-rings (on the outside of the eccentric shafts), or lube for these photos. I will do so when I put it together for real.
 
See less See more
18
#2 ·
Re: Build is a verb

Nice job, very clear and to the point. As I am heading down this road it will be very helpfull, don't stop, keep adding to this with the cam chain and timing. looking forward to the next installments.
 
#3 ·
Re: Build is a verb

Awesome! This write up is very clear and concise, the added points you make really helps a guy like me who is new to this bike and who looks to be soon heading into a top end rebuild. I really hope you continue this and look forward to your next installment.

p.s. your engine is looking mighty clean ;)
 
#6 ·
Re: Build is a verb

Got to agree great effort. Well documented and accurate, having been there more that a few times this summer.
I would have liked to see the cam alignment shots if I was to be very picky as that is a question often asked. ;)

Anyone else agree this post should become a sticky
 
#7 ·
Re: Build is a verb

Thanks, all!
I'm flattered to be nominated for "sticky" status!
I'll edit to add an alignment mark shot, and any other suggestions. Unlike many of you, I've no history with this particular engine. Should I miss anything critical in this or future similar "how to" posts, I hope that someone points it out. I'm in no particular hurry to have this engine actually running, and can do as many "dry" assemblies as needed to document an assembly procedure that is complete and correct.
Yeah, that's right... I'm more into the machine than I'm into riding...
 
#9 ·
Re: Build is a verb

gizwiz said:
Thanks, all!
I'm flattered to be nominated for "sticky" status!
I'll edit to add an alignment mark shot, and any other suggestions. Unlike many of you, I've no history with this particular engine. Should I miss anything critical in this or future similar "how to" posts, I hope that someone points it out. I'm in no particular hurry to have this engine actually running, and can do as many "dry" assemblies as needed to document an assembly procedure that is complete and correct.
Yeah, that's right... I'm more into the machine than I'm into riding...
Excellent if you could add the cam pics. Did you have the cam shim on your bike, not everyone does thats also good to show if you have them. (Of course thay can only be measured up when the cam has been positioned with gaskets and torqued up to see if there is any requirement for them)
I have stickeyd it for you
 
#10 ·
Re: Build is a verb

There is a shim on my cam, but I think I'll need to source more/thicker ones. I looked up the spec, and although I haven't torqued the caps, I expect it to come out sloppy. Certainly some more photos needed for this bit!
 
#11 ·
Re: Build is a verb

nigelrharris03 said:
gizwiz said:
Thanks, all!
I'm flattered to be nominated for "sticky" status!
I'll edit to add an alignment mark shot, and any other suggestions. Unlike many of you, I've no history with this particular engine. Should I miss anything critical in this or future similar "how to" posts, I hope that someone points it out. I'm in no particular hurry to have this engine actually running, and can do as many "dry" assemblies as needed to document an assembly procedure that is complete and correct.
Yeah, that's right... I'm more into the machine than I'm into riding...
Excellent if you could add the cam pics. Did you have the cam shim on your bike, not everyone does thats also good to show if you have them. (Of course thay can only be measured up when the cam has been positioned with gaskets and torqued up to see if there is any requirement for them)
I have stickeyd it for you
Good call Nige. I was thinking of the cam shims too.

BTW, with this topic a sticky maybe a new title is in order?
 
#12 ·
Re: Build is a verb

gizwiz said:
There is a shim on my cam, but I think I'll need to source more/thicker ones. I looked up the spec, and although I haven't torqued the caps, I expect it to come out sloppy. Certainly some more photos needed for this bit!
Great that you look into the shims Paul. Looking forward to follow this topic.
 
#14 ·
Re: Build is a verb

Paul, if you do add more pics can you edit the first post and stick them in with the rest. Would be best if they were all at the top of the post and not lost within the dialog. Also, as Ronny suggested, feel free to change the name of the post to better reflect the subject matter. Wouldn't want it to be overlooked by someone in need, great resource.

Also, this is in the Project Log section, maybe it should be moved, or at least copied, to the Engine section of the 450 group?
 
#15 ·
Re: Build is a verb

HerrDeacon said:
Paul, if you do add more pics can you edit the first post and stick them in with the rest. Would be best if they were all at the top of the post and not lost within the dialog. Also, as Ronny suggested, feel free to change the name of the post to better reflect the subject matter. Wouldn't want it to be overlooked by someone in need, great resource.

Also, this is in the Project Log section, maybe it should be moved, or at least copied, to the Engine section of the 450 group?
Thats a good idea Perry! When Paul is done with the valves and cams we can break out the first post and make it a separate sticky with a new "How to" title so he is free to continue his project log.
 
#18 ·
I've tweaked it. What does the panel of experts think? The last few slides are new, and the bit about the rationale behind the timing position took me a while to figure out, so I'd like to know if you think I'm correct on those details.
I could swear I copied the cam endplay spec right out of my manual, but now I can see there's an inconsistency in the metric/English conversion. The high end of the tolerance should be either .30mm/.012" or .35mm/.014". Probably not terribly important, but I'll nail that down.
Feel free to move this to a more appropriate thread.
Thanks
Paul
 
#19 ·
Fantastic write up Paul.

With my limited knowledge of engines I can still follow this.

Thanks, Ray
 
#20 ·
Re: Build is a verb

Znabb said:
HerrDeacon said:
Paul, if you do add more pics can you edit the first post and stick them in with the rest. Would be best if they were all at the top of the post and not lost within the dialog. Also, as Ronny suggested, feel free to change the name of the post to better reflect the subject matter. Wouldn't want it to be overlooked by someone in need, great resource.

Also, this is in the Project Log section, maybe it should be moved, or at least copied, to the Engine section of the 450 group?
Thats a good idea Perry! When Paul is done with the valves and cams we can break out the first post and make it a separate sticky with a new "How to" title so he is free to continue his project log.
You know, being on multiple forums for multiple purposes, I was pretty surprised to see this forum did not have a "How To" section, especailly how most of projects on this board end up being in pieces, including the engine. I vote for a section, for each model of the bike :p.
 
#23 ·
Great write up, really helped me out yesterday.

Also I found the perfect tool sitting on my work bench for removing stuck valve seals. It is just a simple paint store paint can opener.
 

Attachments

This is an older thread, you may not receive a response, and could be reviving an old thread. Please consider creating a new thread.
Top